Finding Balance as a Blogger

Tips for Finding Balance as a Blogger

Gather a few bloggers together and the question of finding balance will come up every single time! I am not going to say that I have achieved balance, but I wanted to share a few things I have come up with that have helped.

Never Let Someone Else Dictate your Blogging Schedule

Unless they are really making it worth your time!

Make a rough outline of your blogging plan based on your knowledge of your readers and their interests. And don’t change it to fit into another blogger’s schedule.

Just because a blogger, even a big blogger, declares a “month of decluttering”, a “clear out the pantry month”, or “Julia Child Recipe Round Up” does not mean you need to participate. You can simply say, “that is a lovely idea, but it doesn’t fit in my schedule at this time”.

Remember, those bloggers made their plan a while back based on their blogging goals and their readers interests. They didn’t consider your blog plan, so don’t stress yourself out trying to change your blog plan to participate unless it fits in with your goals and fairly closely matches your plans.

Think Long Range When Scheduling Posts

You don’t have to squish every thought, recipe, and project you have ever had on a particular holiday in to one month of posts. Share what you can reasonably share and still keep your sanity. Then write down the other ideas for the next month or year.

Did you have things you wanted to write about for Christmas, but didn’t have the chance? Don’t fret, but don’t post those posts 2 days before Christmas or worse a week after Christmas!  A post written after the fact is fine, if you are sharing Christmas pictures with Grandma, but it is not useful to readers who are looking for timely resources and tips. Write the post, include the pictures and schedule it for early next December. You will be so relieved next December when you discover those scheduled posts.

I wrote and photographed my Hoppin’ John Recipe on January first two years ago. Since it is a traditional New Year’s Day meal, it wouldn’t have the same impact if I shared it on January 2nd of 2012 as it did when I shared it in late December 2013 shortly before New Year’s Day, right about the time people would be thinking about their New Year’s Day Menu.

Write about what Brings you Joy

I was a contributing editor for a political magazine and yet I choose to write about recipes, gardening, and frugality. Why? Because that is what I enjoy. It is what I do in my spare time. It is what I would choose to do, if I could choose to do anything I wanted. I am very lucky that I get to do what I enjoy and have the luxury to write about it. Writing about what I enjoy makes blogging an extension of a pleasurable activity rather than a chore. If blogging has become a chore, evaluate what you are writing about and see if you can find more ways to write about topics that you love.

Write from Your Life

This tip won’t work for everyone, but it does work for me. I blog from my life; I don’t create content. I don’t buy special ingredients for fancy recipes, I don’t publish difficult recipes, and I don’t create beautiful tablescaped backdrops for my recipes. I admire people who do, but that is not my life. It would be a lot more work and it wouldn’t be authentic. I simply take a few pictures of the food I serve my family and remember to write down the ingredients and steps while I cook. This can be applied to many other projects in your daily life from cleaning, to crafting, to gardening. If you blog about what you are doing, it is easier to create balance. Instead of “working”; I am “documenting” aspects of my life.

Break Up Your Posts into Smaller Posts

Instead of writing a monster long, all-inclusive article, examine whether you can break it into smaller pieces. This achieves a couple of objectives: It allows you to create more content from one topic and it allows you to optimize each of those posts for SEO. For example, I could share every aspect of making lasagna in one lengthy post. Or I could share elements of it in smaller posts working up to the actual recipe, where I link back to the earlier posts. Using the lasagna example, here is how the lengthy post could be broken up into smaller posts, culminating in the actual recipe post:

  • Italian Seasoning Mix Recipe
  • Easy Homemade Spaghetti Sauce Recipe
  • How to Make Pasta
  • Frugal Tip: Buy Cheese in Large Blocks and Grate It Yourself
  • Lasagna Recipe

Great content and useful tips are often buried in lengthy posts. By breaking the lasagna recipe into multiple posts, I make it easier for people who are searching on an aspect of one of the steps in creating lasagna to find the information they need when doing a Google search. I also happen to make my life less stressful, because it is easier to write several 300 word posts that it is to write a thesis on lasagna.

Post When You Want

Unless you’ve signed a contract, you can post whenever you want and as little or as much as you want. You don’t have to post every day. In fact, I know very successful bloggers who only post once a week. So don’t beat yourself up, if you don’t have the time, energy or desire to publish a post each day. It is your blog, you are the owner and editor, which means you can set your own schedule. Don’t stress yourself out trying to keep up with someone else’s schedule or trying to follow another blogger’s plan! Only you know  your goals  for your blog and how they fit in with your “big picture”, and you will never reach your goals following someone else’s plan.

How do you find balance as a blogger?
Pinterest Savvy is Free on Kindle Today

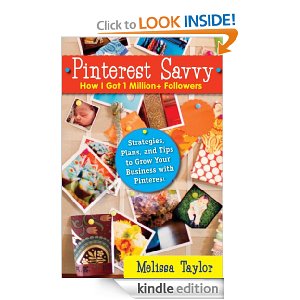
Pinterest Savvy: How I Got 1 Million+ Followers (Strategies, Plans, and Tips to Grow Your Business with Pinterest)
Today there are 3 Free books on Kindle that may be of interest to you as a blogger. I have had a chance to look over Pinterest Savvy and have found that it is filled with tips that I think can really be useful to growing your following on Pinterest. Some tips that I have already used prior to reading this book and have found helpful are:

  1. Create a board named for your blog – pin your blog posts there first before repinning.
  2. Pin from the original source. Then you (and your Pinterest board) will be named as the original pinner no matter how many times it is repinned.
  3. Have detailed boards broken down by micro subjects for areas you want to gain followers. Instead of “Food I want to try” create boards named “Cake Recipes”, “Decorating Tips”, “Barbecue and Grilling Recipes”, etc.

Since Melissa Taylor recommends things that I have already discovered to be effective, I feel that many of her other tips are worth giving a try.

Free Books on Kindle Today:

Pinterest – Build Your Brand, Your Tribe, Your Sales (2nd Ed)

How to get 1000 Real Twitter Followers in 25 Days or Less. A Step by Step Formula.

Pinterest Savvy: How I Got 1 Million+ Followers (Strategies, Plans, and Tips to Grow Your Business with Pinterest)


Thanks to Saving in Nevada for sharing this and other free books on Kindle.

I don’t know how long this book will be free, so check the price before you “buy” it. You don’t have to have a Kindle to take advantage of this deal. You can download Free Kindle Apps for your Computer or Smart Phone.

How to Fix the Copy-Paste Issue on the ShareThis Plugin

I really liked the ShareThis plugin and have recommended it to all of my blogging friends, but if you have upgraded it recently you have probably noticed some annoying changes.

If you copy and paste something from your blog you will see  text and a link added at the end of it (I highlighted the addition in red):

Do you have a Nook reader instead? Here’s how you can find free books on Nook. – See more at: http://savinginnevada.com/free-books-on-kindle-31/#sthash.629CW0oR.dpuf

So not only did they add their text and link, but they removed my hyperlink from the text. It should have looked like this:

Do you have a Nook reader instead? Here’s how you can find free books on Nook.

Supposedly ShareThis made this change to help you track how your posts are being shared across the web, but many people, including me, find this annoying. It also isn’t helping. ShareThis is doing a horrible job tracking shares right now across social media. I found javascript on a WordPress Forum and can show you how to insert it so that ShareThis text and link no longer appear, but I cannot guarantee it will improve how this plugin tracks shares across social media channels. Because I have had a good experience up to now, I am going to give ShareThis a week to improve before I start looking for a replacement.

How to Fix Copy-Paste Issue on ShareThis with Java Script

How to Fix the Copy-Paste Issue on ShareThis

1. Go to Settings and click on ShareThis.

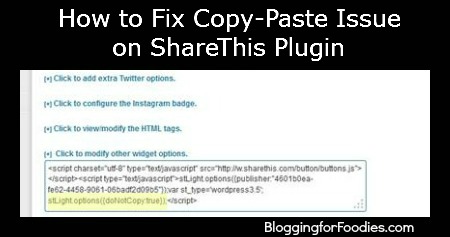
2. Scroll down to Click to modify other widget options. Once you click on it a box will open and you will paste the below JavaScript before </script>.

Here is the Javascript to paste:

stLight.options({doNotCopy:true});

The javaScript is highlighted in the image above, so you can see where to place it.

3. Scroll down to the CopyNShare Beta option and make sure the option in unchecked (the box should be empty!)

4. Scroll down to the bottom of the page and click on the Update ShareThis Options button.

I hope this helps!

How to Optimize a Coupon/Deal Post for SEO and Connect with Readers

Monetization Monday -
How can you optimize a coupon or deal post for Search Engine Optimization (SEO)? The same way you optimize any post for SEO:

Choose a good Post Title 

Name your Photos

Use Keywords

Make Use of Tags

Connect with your Readers! If you engage your readers and they interact with your post and share it, Google is going to take your post more seriously. And you will probably also make more money.

I accidentally discovered this when sharing a post on Pyrex. I just wanted to do my readers a favor and passed on a great deal I discovered. When I wrote the post I did all the things I would normally do for SEO out of habit and the result was that I ended up on the first page of SERPs for that Pyrex item and received quite a bit of search traffic, which I didn’t expect. I didn’t land on the first page of SERPs solely based on my actions, I ended up there because all of the websites who had more credibility than me on Pyrex failed to take those actions.

It is easy to connect with readers about Pyrex when you spend a lot of time writing about leftovers, but what about other types of coupons and deals?

Here are two coupon posts that I feel are a good example of optimizing for SEO while engaging reader from FoodNService:

Free Nyquil and DayQuil at Dollar Tree

Free Cepacol Sensations Cooling Throat Drops (he even includes an internal link to his previous post!)

First let’s talk about the fact that he let’s his voice come through in this post. It is not an automated “go here to get this coupon” post. It is better to write one engaging coupon/deal post a day than quickly push out 10 coupon posts a day. And unless you are a mega blogger,writing one engaging deal post a day is much more profitable than publishing 10 robotic coupon posts.

Now let’s talk about SEO. Why would you go to the bother of optimizing a coupon or deal post for SEO when the offer will expire in a week or two? If you have edited your blog URL so that the date is not included in the post’s URL (How to Customize your URL in WordPress and How to Change Title Format in Blogger) then you can update the post that has already been optimized for SEO with relevant information and links as they become available, and republish the post just by changing the publish date in your dashboard. When you republish that post, it already has a huge SEO advantage all the other similar articles that are posted on the web.

And yes, it is perfectly acceptable to republish posts that have been updated with relevant information!

FREE Kindle Book: Ultimate Heat Map: How to Increase Your Advertising Revenues without Additional Traffic

Ultimate Heat Map How to Increase Ad Revenues without Additional TrafficI just downloaded Ultimate Heat Map: How to Increase Your Advertising Revenues without Additional Traffic  for FREE on to my Kindle.

I more than quadrupled my adsense revenue on my primary blog last month, just by moving my ads around. I am really looking forward to diving into this book to see other ways that I can work smarter without working harder.

I don’t know how long this book will be free, so check the price before you “buy” it. You don’t have to have a Kindle to take advantage of this deal. You can download Free Kindle Apps for your Computer or Smart Phone.

Monetization Monday: Affiliate Programs for Bloggers

Tips for Making Money with Your Blog

I am back after a very long break and instead of boring you with the reason for my absence I am going to give you a gift: A List of Affiliate Programs that you can use to monetize your blog. Originally my intention was to share one affiliate program a week and explain how it worked, but I have decided to give you a list of affiliate programs and then answer any questions you have on them to the best of my knowledge. I want you to apply to the programs that match your site, so you can make more money blogging in 2013.

These affiliate programs are not limited to Americans. You can make money on your blog from just about any location. Why would you sign up for several different affiliate programs? Because although there is some overlap, the different programs cover different companies.

When you apply to the programs you apply as a publisher. As a blog owner you are a publisher, isn’t that exciting? Now go be a publisher that makes money!

My suggestion is to start with the companies that immediately provide you with access to the most companies and campaigns. Skimlinks is by far the best affiliate if you want immediate access to lots of companies. Escalate Network is the best if you are looking for the highest payout for sharing coupons and the easiest methods for sharing coupons.

Affiliate Programs for Bloggers:

Affiliate Programs where you apply once and are then approved for all campaigns:

Skimlinks – You put a piece of code in your footer and then any direct link to a product or store is turned into an affiliate link.

Escalate Network – They have the best coupon resources of any of the affiliate programs.

Logical Media – Has had higher payouts for some of the campaigns and has campaigns like the Mr. Food recipe books which are free to your readers. I like when I can make money offering my readers something for free.

Affiliate Programs where you apply to the program and then must apply to individual campaigns:

LinkShare  Referral  Prg

Link Share –  They have affiliate programs for many companies including Taste of Home, Plow and Hearth, and Walmart.

Google Affiliate Network – Target, Kitchen Aid Mixer, Williams Sonoma and many other companies. There is a Google Chrome extension that will allow you to grab a link for any product on any website that you have been approved for.

Impact Radius – Has the SavingStar coupons, Coupon Network, and many other companies.

Commission Junction – Has DiscountMags, which includes many cooking magazines.

There are more affiliate programs out there, but this list will get you off to a good start. If there is a company that you are interested in becoming an affiliate for,  Google “the company’s name and affiliate program” and you will usually find one of the above companies provide a program.

Related Posts on Monetization: 

How to Monetize Your Blog with Coupons

How to Make Money with the Amazon Affiliate Program

This post contains some affiliate links.

How to Use Twitter to Increase Engagement

Twitter is an effective way to quickly get your posts or information out to followers in 140 characters or less. You can also use twitter to quickly connect with readers and answer questions. Since Twitter forces me to limit correspondence to 140 characters I find I can pop on and tweet without getting bogged down like I do with Facebook. In addition, Twitter levels the playing field. You can respond to any tweet even if that person doesn’t follow you (and you don’t follow them) and that person will see your tweet.

Interested? Go to Twitter and click on the sign up button to get your free account. You enter your name, pick a user name (15 letters or under. I recommend your name or your blog name.) Choose a password (make sure it is not related to any other vital password!) and enter your email. Pretty simple. Now you are ready to start tweeting.

Before you Start Tweeting, Fill Out your Profile!

 How a Food blogger Can use Twitter to Increase Page Views.

1. Upload a picture, nobody wants to follow an egg! (The one you use on your blog and other social media accounts will work).

2. Enter your blog’s URL in the Website field (So many people overlook this step!)

3. Write a short bio. You only have 160 characters, so share things that will help people decide if they want to follow you. If you are a frugal blogger, you don’t have to mention your handsome husband and 5 adorable children. If you are a homeschool blogger, the 5 children lend credibility.

I love my friend Sarah’s  Twitter Bio:

Add bio when setting up a twitter account

You know from her bio that she is really parenting a baby, and though she is so many other things, that is the most important piece of information for someone writing posts on the care and feeding of a baby. Make your bio personal, but make it relevant to what you are writing about.

Add a Twitter Social Icon to Your Blog:

Go ahead and pop off  a tweet if you must, but then come back to your profile and beneath the box where you entered your web address, you will see a link to add twitter to your blog. Click on that and you can then add a twitter follow button on your blog.  If I visit a site and like what I read, I always look for the twitter follow button and am disappointed if I cannot find it.

If you are on WordPress, you can use the Social Media Widget Plugin to add links to all of your social media accounts on your sidebar.

How to Use Twitter as a #Foodie:


When I tweet a post, I check to see if there is a Twitter share button at the bottom of the post, if not I use the share button on my  tool bar. This will automatically shorten the URL, giving you more room to add comments. You can also use Bitly, if you do not have share buttons on your toolbar, but I find this adds an extra step.

To send a tweet to a specific person, put @ in front of the person’s Twitter Username: @BloggingFoodies Do not leave a space between the @ and the Username. If you make a mistake you can delete your tweet and resend it.

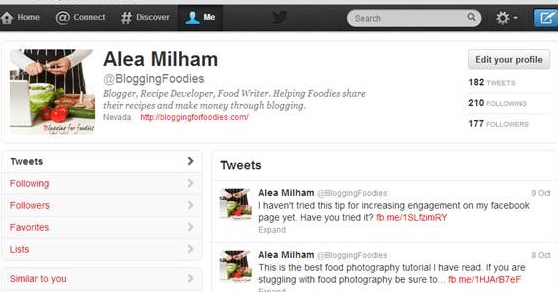
There is a search box in the toolbar at the top of your twitter account. Click on @Connect to view any tweets mentioning you. This means you don’t have to worry about being on twitter all day to catch a tweet directed at you. That is how conversations occur (over several hours/days) despite all of the other tweets, because you can pick up the last comment to you by checking on @Connect. You can also type in your blog name or post title to see if your work is being mentioned.

You can retweet a tweet you think your followers will enjoy by clicking the retweet button beneath the post. Or you can copy it, hit reply, paste the original tweet, then add a RT in front of the post. This is useful if you want to retweet it AND add a comment.

How to Use #Hashtags:

You can add a hashtag (like #organic, #realfood, #glutenfree, #pizza, #dessert, #chocolate, #gardening, #recipe) to a tweet to reach a specific audience of individuals even if they are not followers. You can add hashtags on any word you like, but it helps if it is a word that people search on.  You can also do a search on particular hashtags to see what people are chatting about on that topic to see if it is one you want to use.

Adding a #hashtag also increases your chances of being picked up and included in a paper.li, which increases your distribution.  Paper.li is an online curation platform which allows people to turn tweets into an online “newspaper”.

Don’t use too many hashtags. Pick a couple of hashtags that best represent the content of the link you are tweeting or the community you are trying to reach. If you want to reach several different communities or represent a lot of content with hashtags, it may be better to tweet the link twice and divide the hashtags between the 2 tweets.

TweetGrid is a free application that allows you to follow several key words at the same time. There are several tutorials on how to use TweetGrid on their site, but to jump-start, just click on one of the grids 2 x 2  or 2 x 3. In the upper left you will see a log in button, click on it and it will connect to your twitter account ( a twitter button will pop up asking you to authorize access to your twitter account and you click yes. If it is your first time you may have to enter your twitter Username and password. Many applications ask you to log in using your twitter username and password which is why you want to have a very different password for Twitter than your other accounts).

I use TweetGrid to easily follow a twitter party. Tweet Grid also allows you to schedule tweets in advance, so if you are a night owl you can schedule tweets for when your readers are actually awake.

Following, Followers, and Following Back:

Start by following people who you know and start by following a fairly small amount of tweeters. I would suggest following 15 – 25 of your favorite bloggers. If you are a regular commenter, they may immediately recognize you from your username and bio and follow you back. Follow people who have tweeted your posts, even if they just mentioned your blog name and not your Twitter Username. They may not have realized that you were on twitter and will probably be delighted to discover that you are. As people follow you, add more followers.

As a general rule, I don’t follow people who have thousands of followers, but only follow a few people. I am not interested in being talked at. I also don’t follow people who are only on twitter to sell something. I do follow people who have a product to sell as long as they also share something else besides that product. I follow my local grocery store, although they are obviously selling something, because they share tips, sales and recipes.

I followback almost everybody who follows me.  When someone follows me and I do not already know them, I view their profile page, read their last several tweets, read their bio, and if I am still not sure, I click through to their website to check them out.

What if someone slips through and you find you are following someone you don’t wish to follow. Click on their username, then you will see a button with a gear on it, click on it and scroll down until you see the unfollow option, click and you have officially unfollowed that individual. I have unfollowed people because they used foul language or tweeted about something that I felt was inappropriate.

Who Unfollowed Me is an application that allows you to see who unfollowed you. Sometimes people try to manipulate their numbers to gain a high following. They will follow lots of people and once you follow back, they unfollow you. Every so often I check who unfollowed me. Usually the person who unfollowed me was someone who I did not follow to begin with, however if I did follow the person, the Who Unfollowed Me application allows me to quickly unfollow them if I choose to.

How to Automate Twitter:

Do you have feedburner set up for your blog?  Feedburner allows non-bloggers to subscribe to your blog without having to set up a blogger account. It also allows people who want all of their blog subscriptions in one place to subscribe in a feed reader via RSS. You can follow the Sit’s Girls Simple Instructions for Setting up Feedburner (and Branding your Feed).

If you have Feedburner, you can socialize your feed, so that each new post is automatically sent to twitter.

1. Click on account (next to dashboard)

2. Click on Feedburner

3. Click on Publicize

4. Click on socialize. You will be able to set up twitter feeds from here. Make sure you click the box that says include link, so people can easily find your post. You have the option of having a hashtag automatically attached to each tweet from your blog if you like. If you are a dedicated foodie you may want to add #recipe in the additional text box.

Final Thoughts:

You can customize your header and background on your Twitter profile page, but this is not necessary. It is more important to get up and tweeting than to create a pretty background that few people will see.

Never add hashtags to your post titles. Adding a hashtag to your post title makes you look lazy and  spammy. Either add a  hashtag specific to your niche through feedburner or create a tweet and add a hashtag.

Do not send your Tweets to your Facebook page. Your tweets will seem out-of-place on Facebook and will not generate as much engagement as if you create a unique Facebook status for the same content.

If you are on Twitter, leave your Twitter handle in the comments, so I can follow you.

How to Make Money with the Amazon Associate Program

How to Monetize your blog using the amazon affiliate program

You can easily monetize your blog using the Amazon Associate Program. Amazon doesn’t pay a lot (4% – 10%) but it is easy to use and allows you to create money-making links for items you are already talking about in your posts. Additionally, you receive a percentage of the entire sale, not just the item you recommended.

Ways to Monetize Your Site with Amazon:

Use the site stripe tool bar to quickly create a specific link to a product that you mention in your posts. Every time you mention a specific product whether it is a cooking tool or a hard to find ingredient, you can add a text link to it on amazon. In my Chai Spiced Frosting Post, I linked to both my favorite chai tea and the decorator set I used to frost my cupcakes. If I didn’t link to those items, I would have received emails asking me which tea I used and how I decorated my cupcakes.

The amazon links answer readers’ questions and save me  time. So much so that I was linking to amazon to save time before I was an affiliate. Now I make a little money from doing so. I don’t do this for every single item. I choose to link to the items that I think my readers are most likely to want additional information on.

Share links to cookbooks when you review them.

Share links to free Kindle books. Most of the time you won’t make any money, but your readers will appreciate it. And since you make money on the entire sale, if they happen to add a couple of other books to their free book, you will make a little bit.

Share links to food items when they go on sale. Monitor the food sales and when there is a great sale, share it with your readers.

You can also create a static page with products you recommend and include links to those items on amazon. On your static page, you could also create links to posts you write reviewing those products and add to the page as you think of more products that you like enough to recommend.

Amazon has many options, including widgets, banners, and “stores”, so you can experiment to see what works best for your site.

Disclosure: Although I am talking about affiliate links, this post does not contain any. 

Use Pinterest to Decide Which Posts to Update

Do you know how to tell which of your posts are being pinned? Besides looking at your blog stats at the end of the day. Do you want to know what people are saying about your posts when they pin them, if anything? Or if they are being repinned?

Well, I will show you how, but I don’t want you to waste a lot of time doing this. Use this occasionally as a tool to improve your posts and traffic.

How to find Which Posts are Being Pinned on Pinterest:

In the link below, replace my blog’s URL (it is in orange) with your blog’s URL

http://pinterest.com/source/premeditatedleftovers.com/

and then enter the link in your browser and hit enter and you will be taken to a list of your posts that have been pinned.

How to See which posts are being pinned

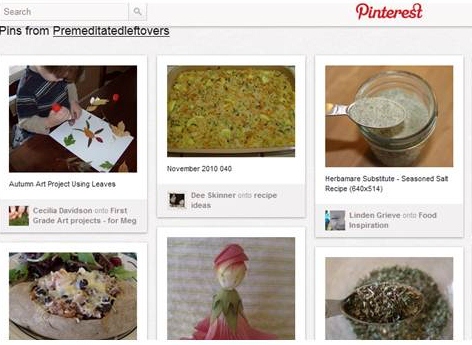
How is seeing which posts have been pinned helpful? Just from these few pins, I can see that my followers are already thinking ahead to fall. Now, would be a good time for me to start sharing fall posts, both old and new, across my social media accounts.

I can also tell that my followers are not writing blurbs, they are using the names of the pictures in my posts. Which is okay for the posts that have nicely named images using key words. But as you can see from the image in the center top row, I still have unnamed images on my blog. And since that casserole is a turkey rice bake, now would be a good time to update that post and name the image because turkey recipes are going to continue to trend over the next 2 months.

How to Update Old Posts:

Rename the Images in Your Old Posts – Seriously, this is huge; take the time to do it.

Include Internal Links to Related Posts this is the easiest way to increase your page views.

Look for Opportunities to Include Key Words and consider bolding key words. Reorganize the post to include  H1 or H2 headings to make your keywords standout and your post easier to follow for your readers.

Monetize Posts with Relevant Ads

Once you have updated your post, go and share it on all of your social media accounts!

Have you started updating your fall and winter posts yet?

Make Money Selling Your Photos Online

Tips for Selling Your Photos Online to iStockphoto

I am not a good photographer, but my oldest son is quite gifted. Unfortunately, he is busy majoring in anthropology and isn’t available to take pictures of my culinary creations. And he would rather eat my food than photograph it! I can’t benefit from his skill, but I thought that he could profit from it so I did a little research.

One of the most popular sites to buy and sell photos is iStockphoto. It also happens to be the source I turn to when I need a stock photo, like the one I used in my header. To sell photos at iStockphoto, you need to:

1. Be a member of iStockphoto.

2. Read a manual based on the type of photos you plan to submit and take a quiz.

3. Submit 3 examples of your work.

Sounds easy…if you know how to take a picture. If this is something you are interested in, Michelle at SomeGirl’s Website has written a series on How to Get Your Photos accepted at iStockphoto.

How to Get Accepted at iStockphoto Part 1

How to Get Accepted at iStockphoto Part 2

How to Get Accepted at iStockphoto Part 3

Many of Michelle’s tips are transferable to other online photography sites.  Here are an additional 18 options for places to sell your photos online.